 |
| Daemon Prince |
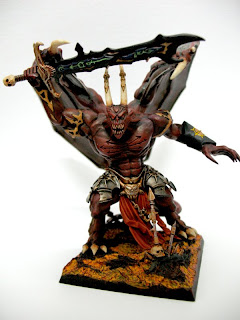
When Games-Workshop released this new model, I knew I had to get my hands on one of them. The model is really what I had imagined how a Daemon Prince would be. Muscles out of proportions, a menacing face, sharp teeth, pointy horns, wings and of course, a big sword. Out from the box, you could either arm the Daemon Prince for Warhammer Fantasy Battles or Warhammer 40k. From the picture above, you can see that I've armed the Daemon Prince for Warhammer Fantasy Battles (it's the base that determines that :P ). Please note that the paints I used are mostly the old paints from Games-Workshop.
What is used
First off, preparations for the whole task. Get a good table for painting with good lighting. Next, have a set of brushes. I have with me, fine detail brush, a normal size 1 brush, small flat brush for dry brushing and another one which is bigger. I have a cup with water readied and these are the paints that I will use:
- Chaos Black
- Blood Red
- Blazing Orange
- Sunburst Yellow
- Chainmail (the colour)
- Beastial Brown
- Bleached Bone
- Skull White
- Goblin Green
- Regal Blue
- Dwarf Flesh
- Shining Gold
- Flesh Wash (will be used a lot)
Starting from the base
As with my entire army, I would start off with the
lava base first. In addition to this base, I used one of the trophy racks and glued it in front of the Daemon Prince. The Chaos icon, I glued it facing to the back. With just that, I've completed the base for my Daemon Prince.
Gluing Parts Together
While the base is left to dry, I started of by picking the parts which I would use for my Daemon Prince. First I would choose the head, I like the one with long straight horns and with many sharp teeth! Next, for the right arm, of course I picked the big sword over the axe. I don't have any options for the left arm, torso and legs. I would not be gluing the wings to the body yet so I'll just leave them aside. After selecting the parts that I wanted to use for the Daemon Prince, next I'll be cleaning these selected parts. By cleaning, I would mean filing off the mould lines. We wouldn't want these lines to be visible when the model is finished. About half-hour passed, mould lines cleared away, I'm ready to glue the selected parts together.
Undercoat
I would make sure that the glue is completely dry before I start to undercoat my models. A lot of people would use Citadel Chaos Black or Games-Workshop's black spay to undercoat their models. I didn't have Games-Workshop's spray paints and I didn't want to use much of my Chaos Black as undercoat. I did, however have those aerosol sprays which I could easily get from hardware stores. I used the Flat Black. Holding the spray about one foot away from my Daemon Prince, I started spraying to an open area on the right and then across to the left through my model in a gentle stroke. Ensuring the same thickness throughout the sprayed area. Keep repeating the same process from different angles till the whole model is fully covered in black paint. At the same time, I would also undercoat the wings which were not glued on the Daemon Prince yet.
 |
| Daemon Prince - Left View |
Base Paint
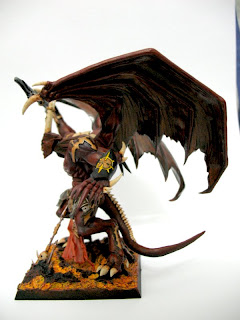
RED. Definitely red for the skin. Most probably because the Daemon Prince looked more affirmed to Khorne than the other chaos gods. Also it would look really awesome when fielded along with my bloodletters in the field. I wanted my Daemon Prince to have a darkish grim look. So, straight out from the pot, Blood Red, dry brush the whole model. Yes. I did it with the most simplest of method but with this model, it has many large and small areas. So on different locations, different sizes of brush would be used. I would avoid having too much paint on the areas in between muscles or joints to maintain the dark look and not too thick. For the wings, I dry brushed the the wing's forearms and the "fingers" with Blood Red. For the horns, plates on the back, claws on the wings, claws on feet and teeth are painted with Bleached Bone.
Hightlight
For highlighting, I chose Blazing Orange to just dry brush on the highest areas of the muscles, the face joints. These would bring out the Blood Red base colours and make the skin look less bland. For the parts that was painted with Bleached Bone, I had Skull White mixed with Bleached Bone and add in water to dilute the mixture. Then lightly paint them on the edges of the areas with Bleach Bone to bring out more of the colour. As it was diluted, the first layer should almost be unseen as more layers you do, it would be more obvious. After that's done, I proceed on to the wings.
 |
| Daemon Prince - Back View |
Wings
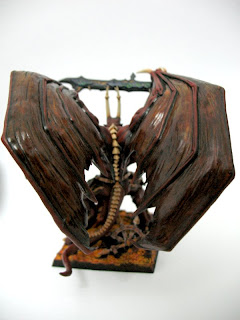
As for the wings I chose not to do a conventional style of painting but to opt for a more darkish shiny style. The wing's forearms and "fingers" are already painted so what's left are only the membrane area. What I did was to use Dwarf Flesh as the base colour for the membrane. Dry brush the whole area with it. Then I used Flesh Wash, first diluted with water, paint it over the parts painted with Dwarf Flesh. The next layer I used the Flesh Wash right out from the pot directly on to it. Slowly when this area dries, it gives a dark brownish yet shiny as seen in the picture above.
Claws, Plates and Horns
Next up are the horns, claws and plates on the back of the Daemon Prince. These are already painted with Bleached Bone and highlighted. The next thing I wish to add are layers of of brownish colour that connects between these claws and the skin and in between the plates. I use diluted Flesh Wash to have this effect. I made sure that it's pretty this as the Flesh Wash is pretty dark especially on lighter colours. So I had more layers of this on to the areas nearest to the skin and less towards the middle of the claws. With that done, I pretty much have my Daemon Prince almost completed.
 |
| Daemon Prince - Sword and Horns |
The Sword
What would be a sword that is held by a Daemon Prince. In my mind it would not be a normal metal sword but a sword that was forged in the realm of chaos. The sword already comes with runes carved into it. So I decided to have the sword to be in black but the runes clearly visible. So to spark the contract of colours, I chose to have green and yellow to be in the deep of those carved runes. I used Goblin Green that was added with Skull White and Sunburst Yellow. The embossed area of the runes I used Regal Blue as I still want to maintain a contrasting colour to the runes. And finally a few layers of thick Chaos Black on to the whole blade. For the hilt, I painted over it a slightly thinned Chainmail (it name of the colour) and then again slightly thinned Flesh Wash. This would leave it to have some sort of rusted / golden colour to it. Then handle painted with Beastial Brown and washed with Flesh Wash out of the pot. At the end of the sword is a skull which is painted with Bleach Bone and washed lightly with Flesh Wash.
Other Details
Now comes all the small details or added effects on the entire model. There are quite a number of shapes and arrows or diamond shapes around the skin of the model which I have decided to paint gold on them. Make it look more Khornish and also brings out the model. So I painted these carefully leaving a tiny gap from the undercoat black with Shining Gold.By doing this, as you can see from the picture above, the gold looks apart from the skin and horn making it stand out more. Then I painted Blazing Orange for the eyes to have that scary daemonic eyes that stare at people. Lastly the bracers, I chose to leave it black but to have the chaos symbol to be painted in Sunburst Yellow and Shining Gold at the middle part of the symbol. With that, the Daemon Prince is complete but wait, there's still more painting to do. At the base, I've added in the half-symbol and the trophy rack. These two are painted with Chainmail (the colour, again) and then washed with Flesh Wash (using this a little too much). Also on the trophy rack, some of the parts I added with a little bit of Shining Gold, and painted the skull with Bleached Bone. The thigh of the Daemon Prince look a bit too plain but luckily from the box they added the plates that would cover up the whole thigh area. I dry brushed them with Chainmail and then washed a few times with very diluted Flesh Wash. Finally the cloth on the groin area. I painted the cloth with Blood Red and then highlighted it with Blazing Orange. The metal parts of this piece is painted with Chainmail and washed with Flesh Wash. The teeth or claws that was attached to it was painted with Bleached Bone. Nothing too fancy but enough to add a little more flavour at the lower part of the whole model. So with that, sit back and enjoy the completed Daemon Prince of Chaos.
 |
| Daemon Prince - lower section |


