Showing posts with label daemons of chaos. Show all posts

Thursday, July 12, 2012

Daemon Prince - How I Painted Mine

Daemon Prince
Daemon Prince
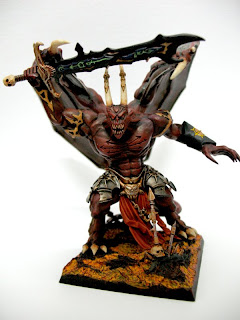
When Games-Workshop released this new model, I knew I had to get my hands on one of them. The model is really what I had imagined how a Daemon Prince would be. Muscles out of proportions, a menacing face, sharp teeth, pointy horns, wings and of course, a big sword. Out from the box, you could either arm the Daemon Prince for Warhammer Fantasy Battles or Warhammer 40k. From the picture above, you can see that I've armed the Daemon Prince for Warhammer Fantasy Battles (it's the base that determines that :P ). Please note that the paints I used are mostly the old paints from Games-Workshop.

What is used

First off, preparations for the whole task. Get a good table for painting with good lighting. Next, have a set of brushes. I have with me, fine detail brush, a normal size 1 brush, small flat brush for dry brushing and another one which is bigger. I have a cup with water readied and these are the paints that I will use:
  • Chaos Black
  • Blood Red
  • Blazing Orange
  • Sunburst Yellow
  • Chainmail (the colour)
  • Beastial Brown
  • Bleached Bone
  • Skull White
  • Goblin Green
  • Regal Blue 
  • Dwarf Flesh
  • Shining Gold
  • Flesh Wash (will be used a lot)

Starting from the base

As with my entire army, I would start off with the lava base first. In addition to this base, I used one of the trophy racks and glued it in front of the Daemon Prince. The Chaos icon, I glued it facing to the back. With just that, I've completed the base for my Daemon Prince.

Gluing Parts Together

While the base is left to dry, I started of by picking the parts which I would use for my Daemon Prince. First I would choose the head, I like the one with long straight horns and with many sharp teeth! Next, for the right arm, of course I picked the big sword over the axe. I don't have any options for the left arm, torso and legs. I would not be gluing the wings to the body yet so I'll just leave them aside. After selecting the parts that I wanted to use for the Daemon Prince, next I'll be cleaning these selected parts. By cleaning, I would mean filing off the mould lines. We wouldn't want these lines to be visible when the model is finished. About half-hour passed, mould lines cleared away, I'm ready to glue the selected parts together. 

Undercoat

I would make sure that the glue is completely dry before I start to undercoat my models. A lot of people would use Citadel Chaos Black or Games-Workshop's black spay to undercoat their models. I didn't have Games-Workshop's spray paints and I didn't want to use much of my Chaos Black as undercoat. I did, however have those aerosol sprays which I could easily get from hardware stores. I used the Flat Black. Holding the spray about one foot away from my Daemon Prince, I started spraying to an open area on the right and then across to the left through my model in a gentle stroke. Ensuring the same thickness throughout the sprayed area. Keep repeating the same process from different angles till the whole model is fully covered in black paint. At the same time, I would also undercoat the wings which were not glued on the Daemon Prince yet.
Daemon Prince - Left View

Base Paint

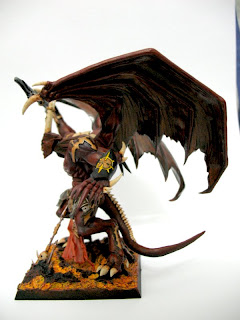
RED. Definitely red for the skin. Most probably because the Daemon Prince looked more affirmed to Khorne than the other chaos gods. Also it would look really awesome when fielded along with my bloodletters in the field. I wanted my Daemon Prince to have a darkish grim look. So, straight out from the pot, Blood Red, dry brush the whole model. Yes. I did it with the most simplest of method but with this model, it has many large and small areas. So on different locations, different sizes of brush would be used. I would avoid having too much paint on the areas in between muscles or joints to maintain the dark look and not too thick. For the wings, I dry brushed the the wing's forearms and the "fingers" with Blood Red. For the horns, plates on the back, claws on the wings, claws on feet and teeth are painted with Bleached Bone.

Hightlight

For highlighting, I chose Blazing Orange to just dry brush on the highest areas of the muscles, the face joints. These would bring out the Blood Red base colours and make the skin look less bland. For the parts that was painted with Bleached Bone, I had Skull White mixed with Bleached Bone and add in water to dilute the mixture. Then lightly paint them on the edges of the areas with Bleach Bone to bring out more of the colour. As it was diluted, the first layer should almost be unseen as more layers you do, it would be more obvious. After that's done, I proceed on to the wings.
Daemon Prince
Daemon Prince - Back View

Wings

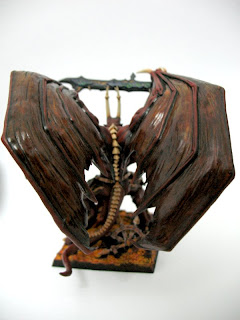
As for the wings I chose not to do a conventional style of painting but to opt for a more darkish shiny style. The wing's forearms and "fingers" are already painted so what's left are only the membrane area. What I did was to use Dwarf Flesh as the base colour for the membrane. Dry brush the whole area with it. Then I used Flesh Wash, first diluted with water, paint it over the parts painted with Dwarf Flesh. The next layer I used the Flesh Wash right out from the pot directly on to it. Slowly when this area dries, it gives a dark brownish yet shiny as seen in the picture above.


Claws, Plates and Horns

Next up are the horns, claws and plates on the back of the Daemon Prince. These are already painted with Bleached Bone and highlighted. The next thing I wish to add are layers of of brownish colour that connects between these claws and the skin and in between the plates. I use diluted Flesh Wash to have this effect. I made sure that it's pretty this as the Flesh Wash is pretty dark especially on lighter colours. So I had more layers of this on to the areas nearest to the skin and less towards the middle of the claws. With that done, I pretty much have my Daemon Prince almost completed.

Daemon Prince
Daemon Prince - Sword and Horns

The Sword

What would be a sword that is held by a Daemon Prince. In my mind it would not be a normal metal sword but a sword that was forged in the realm of chaos. The sword already comes with runes carved into it. So I decided to have the sword to be in black but the runes clearly visible. So to spark the contract of colours, I chose to have green and yellow to be in the deep of those carved runes. I used Goblin Green that was added with Skull White and Sunburst Yellow. The embossed area of the runes I used Regal Blue as I still want to maintain a contrasting colour to the runes. And finally a few layers of thick Chaos Black on to the whole blade. For the hilt, I painted over it a slightly thinned Chainmail (it name of the colour) and then again slightly thinned Flesh Wash. This would leave it to have some sort of rusted / golden colour to it. Then handle painted with Beastial Brown and washed with Flesh Wash out of the pot. At the end of the sword is a skull which is painted with Bleach Bone and washed lightly with Flesh Wash.

Other Details

Now comes all the small details or added effects on the entire model. There are quite a number of shapes and arrows or diamond shapes around the skin of the model which I have decided to paint gold on them. Make it look more Khornish and also brings out the model. So I painted these carefully leaving a tiny gap from the undercoat black with Shining Gold.By doing this, as you can see from the picture above, the gold looks apart from the skin and horn making it stand out more. Then I painted Blazing Orange for the eyes to have that scary daemonic eyes that stare at people. Lastly the bracers, I chose to leave it black but to have the chaos symbol to be painted in Sunburst Yellow and Shining Gold at the middle part of the symbol. With that, the Daemon Prince is complete but wait, there's still more painting to do. At the base, I've added in the half-symbol and the trophy rack. These two are painted with Chainmail (the colour, again) and then washed with Flesh Wash (using this a little too much). Also on the trophy rack, some of the parts I added with a little bit of Shining Gold, and painted the skull with Bleached Bone. The thigh of the Daemon Prince look a bit too plain but luckily from the box they added the plates that would cover up the whole thigh area. I dry brushed them with Chainmail and then washed a few times with very diluted Flesh Wash. Finally the cloth on the groin area. I painted the cloth with Blood Red and then highlighted it with Blazing Orange. The metal parts of this piece is painted with Chainmail and washed with Flesh Wash. The teeth or claws that was attached to it was painted with Bleached Bone. Nothing too fancy but enough to add a little more flavour at the lower part of the whole model. So with that, sit back and enjoy the completed Daemon Prince of Chaos.

Daemon Prince
Daemon Prince - lower section

Friday, April 6, 2012

Herald of Khorne – Daemons of Chaos Hero

One of the most capable hero class characters for Daemons of Chaos is the Herald of Khorne. There are a lot of good reasons to it and especially when you're fielding the herald with Bloodletters, the effectiveness of the unit. Here's a list of reasons why I would say that the Herald is a good character for your Daemons of Chaos army.
Herald of Khorne
Herald of Khorne
 

Good Basic Stats
The herald comes with very good basic stats. High weapon skill, high strength, high initiative. These three stats are what is wanted for you to kill off your opponents effectively. High initiative means that a lot of times, you get to hit your opponent first. That means less chance for your opponents to hit you back especially in a challenge where you kill your challenger straight off. High weapon skill will enable you to make sure that you have a 66% chance of hitting your target. Don't forget, the herald also have the hatred rule, this enables you to re-roll the 33% that you missed! High strength does what it does best, wound you opponent easily. Don't forget the Killing Blow ability which could outright kill off a character and gives your victims no armour saves.

Abilities
  • Hatred. The ability to re-roll missed to-hit rolls in close combat. You would want to maximize the number of hits by this guy. This is one of the big plus why you have to have him in your army.
  • Locus of Khorne. Join the Herald of Khorne into a unit of Bloodletters or Bloodcrushers. The whole unit will now have the Hatred rule. Now the whole unit is really boosted up with the presence of the herald.
  • Killing Blow. One of the most feared skills by characters and cavalry. It allows no armour saves and kills off the target regardless of how many wounds left. Unless your opponent is immune to killing blow, they would have this in mind when they face the herald.
  • Magic Resistance (1). Although it doesn't seem much but if your herald is running alone, you'll need every single protection from shooting and magic missiles. This won't help you with shooting but it would increase your defence against magic by increasing your ward saves.

Chaos Gifts
  • Armour of Khorne. Daemons normally do not have any armour saves but being under Khorne, the herald gets to equip himself with Armour of Khorne. This armour gives you 3+ armour saves which would enhance your survivability.
  • Daemonic Robes. This gift is hardly used as it does not give any armour saves but gives your herald a better surviving chance against high strength opponents and against warmachines.
  • Etherblade. This gift of a weapon ignores the target's armour saves but why need to spend additional points when you already have a killing blow that ignores armour saves? I would rather spend the points on other gifts or points for the army.
  • Firestorm Blade. This is a fairly common gift that is given to the herald but it is also double edged as if your opponent is very sure that you would equip your herald with this gift, they could equip their characters against flaming attacks. This would render your herald ineffective against them. On the other side, you can negate regeneration and with strength seven, you could even slay monsters (only easier).
  • Obsidian Armour. An expensive armour that negates magical weapons against him but also gives a good 3+ armour saves. I wouldn't recommend it due to the high costing value.
  • Soul Hunger. The Herald of Khorne have only 3 attacks. So with high weapon skill, Hatred, strength six, Killing Blow, I think Soul Hunger would be overkill to ensure that all 3 attacks would wound.
Herald of Khorne
Herald of Khorne

Battle Standard Bearer
The Khorne Herald can also be the army battle standard bearer. The reason is simple because it allows you to re-roll a sudden bad roll on a instability test and of course of the magical icons that you could carry with it. As the herald usually joins a unit of Bloodletters or Bloodcrushers, it is very useful to be able to re-roll bad rolls on instability tests. Especially when you lose combat, re-rolling those high rolls or even rolling doubles 1s would save the unit. The icons that the herald could carry are only five:
  • Banner of Hellfire. It contains a bound spell of power 5 that deals D6 strenghth six hits to all nearby enemies. Sounds pretty awesome but at the cost of another herald! Apart from that, it would require you to use up 2 power dice to cast it (effectively unless you wish to try a single 33% dice roll). Too expensive to carry and eats up power dice which is important for your other wizards. This banner is meant for 7th edition and before.
  • Banner of Unholy Victory. In the days where you can now always attack in 2 or 3 ranks (horde), static combat resolution has not been very important. It would make a difference only if your opponent would be as destructive as your unit in close combat.
  • Great Icon of Despair. My favourite icon. This icon has given a lot of opponents a lot of headache when they have to take fear tests at -2 to their leadership. Very useful against opponents with leadership value of 8 and below. Look at your opponent's face when they have to take their leadership at -2.
  • Great Standard of Sundering. Another banner that is really good against opponents that would concentrate much on magic. Especially after deployment has been done, only that you reveal you have this ability. Reduces their ability to cast spells and oh... remember not to have your own wizards to have spell of light.
  • Standard of Chaos Glory. A great banner if you wish to tarpit your opponent's unit. It costs a bomb but sometimes could help out with you have to slowly grind away your opponent. Otherwise if you would win in most close combat situations, this banner would be a waste.

Conclusion
The Herald of Khorne is always a good addition to your Daemons of Chaos army. Always put him either in a unit of Bloodletters or Bloodcrushers and he will not only help increase the effectiveness of the unit but also being able to survive and perform. He is not the most toughest character in Warhammer Fantasy Battles but he is certainly one of the most cost effective character.

Friday, March 30, 2012

Bending Plastic – Hair Dryer Method

Have you ever had problems with ranking up your models in a unit? Have you ever wished that some of your plastic models were posed differently? Have you ever wanted your model's arms would bend slightly higher? Wanted so much but never thought of how to accomplish that? Bend it! Of course, you don't just bend it with your bare hands, that would break them. So how do we do that without damaging the model?

CAUTION: The method below can and have a chance of damaging your model. Proceed with this method with caution and at your own risk. The owner of this article will not be responsible for any damages caused by following the methods described.

Okay, now that you've read the caution above, please follow the steps here very carefully. Also be very careful as not to cause yourself harm as it will deal with HEAT.

hair-dryer
Hair-dryer with custom paper nozzle


First, get yourself a hair dryer. A normal heat producing hair dryer would do. As you can see in the picture above, I used a normal hair dryer but attached to it is a custom made nozzle. Next, get a piece of paper. I would suggest to use A4 sized paper. Roll it up into a cone shape and tape it up that the shape would not go loose. Then you can use a rubber band and tie the nozzle to the hair dryer like in the picture. With that, you're ready to bend!

At this point, you're messing with elements of danger. Both to you and your plastic model. Get yourself a pair of gloves which you know could withstand heat. Wear them.

Bent banner can be used as cloak

Next, place the hair-dryer on the table with the nozzle facing away from you. Make sure you do not have anything else in front of the nozzle area. This is because when you switch on the hair-dryer, the wind will blow away a lot of stuff in front of it. Once you have a clear space in front of the hair-dryer, try switching it on. If the hair-dryer moves, try to anchor it with something (a book or anything that could weigh it down). Switch it off and prepare your model.

Once you are ready, switch the hair-dryer on, move your model with the intended part to bend to the nozzle. Hold it gently but not too soft that the model will get blown off by the wind. Pay careful attention to your model. If the part you wish to bend is very thin, you have to be very careful as the heat might soften the plastic very quickly and bend by itself or worse, melted off! If the plastic part you wish to be is at the size of a normal Empire human plastic model's arm, it will take a few seconds before the plastic softens up for you to bend.

Reposition model to pose in the way you wanted

Try put around 5 seconds and move it away from the hair-dryer and try to use some light force to bend it to the direction that you want. If it's still hard, then put it to the hot air again. Repeat this a few times till if softens up a bit that you can slowly bend it the way you wanted.

This method requires practise and I would suggest that you try it with the plastic sprues first and not on your actual model. Different brands of hair-dryer or different sizes may vary in terms of heat strength and effectiveness.


Thursday, March 29, 2012

Flamers of Tzeentch – Quick Painting Guide

Flamers of Tzeentch
Completed Flamer


Here's a quick and easy way to paint your flamers. It will be acceptable to field in battle and a nice addition to your Daemons army. In this example, I had already completed the base and left with the flamer model itself.

What do you need:
Flamer Model
Brush for base painting
Brush for details
Brush for dry brushing
Spray Paint (black, optional)
Chaos Black
Skull White
Regal Blue
Red Gore
Blazing Orange
Golden Yellow
Beastial Brown
Ogryn Flesh / Flesh Wash (optional)

First off, prime your flamer black. You could spray coat it as I have done here or your could undercoat it with Chaos Black.
Flamers of Tzeentch
Lower part painted with Regal Blue


Next, use Regal Blue to paint the lower part of the flamer. Leave the parts with the fangs untouched. Just paint the lower half skin area.

Flamers of Tzeentch
Red Gore for the upper part

Paint Red Gore to the upper part of the flamer. Leave out the flames and the fangs areas.

Dry Brush mix of Regal Blue and Skull White

Next mix Regal Blue and Skull White to a ratio of 70:30. Dry brush the mixture over the initial lower part painted with Regal Blue. Make sure you dry brush the border between Regal Blue and Red Gore. This will be the part where it will have the blending look from red to blue. Then have another mixture of 30:70 Regal Blue and Skull White. Dry brush lightly on the same location as this would be the highlight of the skin areas. You can also do the same on the tentacles for the lower parts.

Flamers of Tzeentch
Dry Brush Blood Red then Blazing Orange

Dry brush Blood Red all over the areas of the Red Gore. This will bring up all the muscle tones of the flamer. After that is completed, get Blazing Orange and dry brush it lightly over the highest parts of the muscles and skin. The Blazing Orange would be the highlight areas of your flamer.

Flamers of Tzeentch
Details Painted

Now for the details of your flamer. Have a mixture of Red Gore and Skull White to a ratio of 30:70 and paint the tongues of your flamer. Paint Beastial Brown on the gums of the fangs and Bleached Bone for the fangs. You can then wash the gum area with watered down Ogryn Flesh or Flesh Wash.

Flamers of Tzeentch
Flames Painted

Finally the flames on the flamers. Paint the whole flames area with Golden Yellow. Next, dry brush the flames with Blazing Orange. Don't cover the Golden Yellow part entirely. Allow the deep areas to be untouched. Next dry brush lightly with Beastial Brown on the flames. Lastly, dry brush Chaos Black very lightly the areas of the Beastial Brown.

Thursday, March 22, 2012

Herald of Khorne Conversion

I have always liked to personalize my own army to make it unique and easily recognized to be of my own. For Daemons of Chaos, there are limitless possibilities that you can do with Daemons. Daemons afterall, don't really have to follow the usual humanoid shapes. You can many armed monstrocities, extremely large heads or limbs, oversized weapons, multiple heads and the list could go on and on. As for your characters of course you would like to make them very outstanding and easily distinguished when you place them among your troops.

As for my first conversion for my Herald of Khorne, I opted not to go overboard but to use mostly from the Bloodletter box and minimally only used three separate bits from Empire bits. So here is the list of items that I have used for this conversion

  1. PVA glue + water mixture
  2. Tissue paper
  3. Khorne icon from bloodletter standard bearer
  4. Banner from bloodletter standard bearer
  5. Bloodletter body and leg
  6. Bloodletter army (left and right)
  7. Bloodletter champion head
  8. Empire shields x 2
  9. Empire flagellant head
  10. Small pin
  11. Super glue
  12. Plastic glue
  13. Hair dryer with paper nozzle
  14. Pen knife

To start off, I make the base of the herald with the PVA glue + water mixture + tissue. As this is the theme of my entire army, they would all have the lava based base. Mould the base up to look like a rock. Before setting it up to dry, take the Khorne icon from the bloodletter standard bearer set and cut it out from it's stand. Stick the icon to the base where it would be the front of your herald. Make sure that most of the tissue and glue has contact over the icon so that it would stick when it's dried. After this is completed, you can set it out to dry.

Once the base is completely dry, glue the herald's body (of course!) to the base. I used superglue excessively for this to crystalize some of the base with the herald's foot. As the tissue hardens, you may not have a full contact on the foot of the herald. The crystalization of the superglue would support how well the herald stick to the base. At this point, you do not have to worry if the herald would be facing too high up or too low, the next part will handle this. Wait till the superglue is dried, you may wish to reposition the herald body. Use the hair dryer with a custom made paper nozzle to bend the legs of the herald that it would be facing in your intended position.
Icon, body and tissue + PVA glue + water mix all glued
Next glue both army to the body with plastic glue. Wait for it to dry and then by using the same method and the legs, use the hair dryer with custom made paper nozzle to bend the arms. I even bend some of the fingers of the left arm to the shape I wanted. It's going to hold a severed head by the end of the conversion. The arm holding the hellblade, I bent it face forward and raised the sword slightly higher. I can't bend it too much as I have to leave some space for the shoulder pads and also the big head.

Arms bent and glued to body

Next up are both shoulder pads. Get two Empire shields, file off the details and then use the hair dryer with the custom paper nozzle to bend it slightly. It's pretty simple and fast to do but be careful as they are small and easily get over bent.
Shoulder pads made from Empire shields

Just as I'm finished with the shoulder pads, why not I continue wit the cloak for the herald. Cut off the banner from the standard bearer stand. Same method as the shoulder pads, I slowly bend the cloak. I had made sure that I could place two more bloodletters behind my herald with this cloak bent in this way.
Cloak for the Herald

For the severed head, I simply make cuts at the neck area till it looked like it was a severed neck. Then I glued two very small pins to the cut area. This would make the neck to look like it was torn out with two remaining veins tagging along.
Severed head

Now that all the parts are completed, what's left are just painting and glueing them together. As I already have a theme of painting my whole army, they would stay the same for the base, herald's skin colours, hellblade, horns, fingernails, teeth and so on. I have not yet glue the shoulder pads, the head and the cloak. I prefer to have them painted first and then only glue them together. For the Khorne icon, I have it base coloured with Chainmail and then washed with Flesh Wash. The inner layer of blood covering the icon would be in Red Gore while the top most blood layer would be Blood Red. The skulls on the icon would be as how I would paint most of the skulls which is Bleached Bone and washed with watered down Flesh Wash. For the severed head, I had a mixture of Bleached Bone added with Dark Angels Green. Then washed thinly with Flesh Wash. The neck area are dry brushed with Red Gore. For the shoulder pads, I base painted Red Gore on it and added Khrone markings on both of them with Chainmail. Added with some Flesh Wash, it would have some golden rusty look on the Chainmail. Finally for the cloak, I had it fully based with Red Gore then outlined with Blood Red. The designs on the cloack was first painted with Blood Red and then painted again with Blazing Orange.

Now everything has been painted up, it's time to glue them together. Start off with something simple. I'll go with the shoulder pads. Pretty straight forward, I just glue them on both shoulders. Then while waiting for the glue to dry, I glued the severed head to the left arm. It gets a bit tricky with my clumsy fingers so it took me some time before I manage to glue it on the right position that I had wanted. Finally it's the cloak. I took a simple path and just glue the top ends of the cloak directly on the shoulder pads. The contact point is pretty small, so be sure to reinforce it with a little bit more glue. I used a little bit extra super glue to do this job. With that glued up, that completes my herald of Khorne.
Khorne Herald
Frontal look
Khorne Herald
From the sides
Khorne Herald
From the top

Herald of Tzeentch Conversion

Tzeentch creatures have always been perceived as being weak in close combat but strong in magical ability. Thus having the common weak physique as everyone would think they “should” have. For this Tzeentch herald, I wish to have a different look and change all that perception about Tzeentch characters having a weaker body. What I had in mind, that this character, fluff wise, would have been able to take over a chaos warrior's mind and manifested itself from the body of this warrior's body. This enabled the herald to possess the strong physique of a chaos warrior. I didn't want to make this into a major conversion project and opted for a simple way gluing a few part together. Here is a list of what I used for the herald:
  1. Warrior of Chaos body and back (includes the cloak)
  2. Icon from Horrors of Tzeentch standard bearer
  3. Head from Horrors of Tzeentch champion
  4. Arm from Horrors of Tzeentch sprue
  5. Tongue from Horror's sprue (cut out from one of the model's body)
  6. PVA glue + water + tissue
  7. Book from Empire flagellant sprue
  8. Modeling file (for filing off unwanted parts)
  9. Superglue
  10. Plastic glue
  11. Putty
  12. Cutting knife
Out from the sprue

First off, I would start off would the base as it would take time for it to dry. My usual PVA glue + water + tissue base would be used for my whole Daemon's army so it would not be any different for this model. So while I am waiting for it to dry, I could start working on the body. Glue the warriors of chaos body together and then file off the feathery part of the cloak. This is actually not really important but I didn't want it to have too many parts resembling it's previous form of a chaos warrior. Then by using putty, form up the neck area similar to how they are done with the Horror's body. Quickly before letting the putty to dry, stick the tongue to the neck area. I had made sure that later, the head part would fit nicely before leaving it to dry and harden.

Next, I scrapped off some parts of the right arm from the warrior's body. This would allow the Tzeentch icon and the arm to be positioned higher and at a position where I would want them. The Tzeentch icon has two arms connected to it but I would only want only one. So the other arm had to be cut off and the shoulder part was also cut off. There is already sufficient upper arm area and the shoulder from the warrior body for me. For the left arm, I would just cut off the upper arm area leaving just the lower arm part. Next, I would glue both the arms to the body and that would almost complete the whole conversion. 

Finally painting all the parts as how would want them. The base is done first and that would follow the theme of my whole Daemon's army. The skin, I had already decided upon a purplish colour and the armour to have a mixture of blue and chainmail. For the cloak would also be a darker shade of blue and flaming colours added to the icon. All the smaller details would follow simple common colouring and finally the book from the Empire flagellant sprue. The book is then glued to the left arm completing the whole model.
A close look on the herald
Another look on the herald
Close look on the icon


The whole model

Lava Base for the Entire Army

This summary is not available. Please click here to view the post.